Amplifying Analog Voltages with the LM358
05.03.2025
Elektronik | Funk | Software
Der Technik-Blog

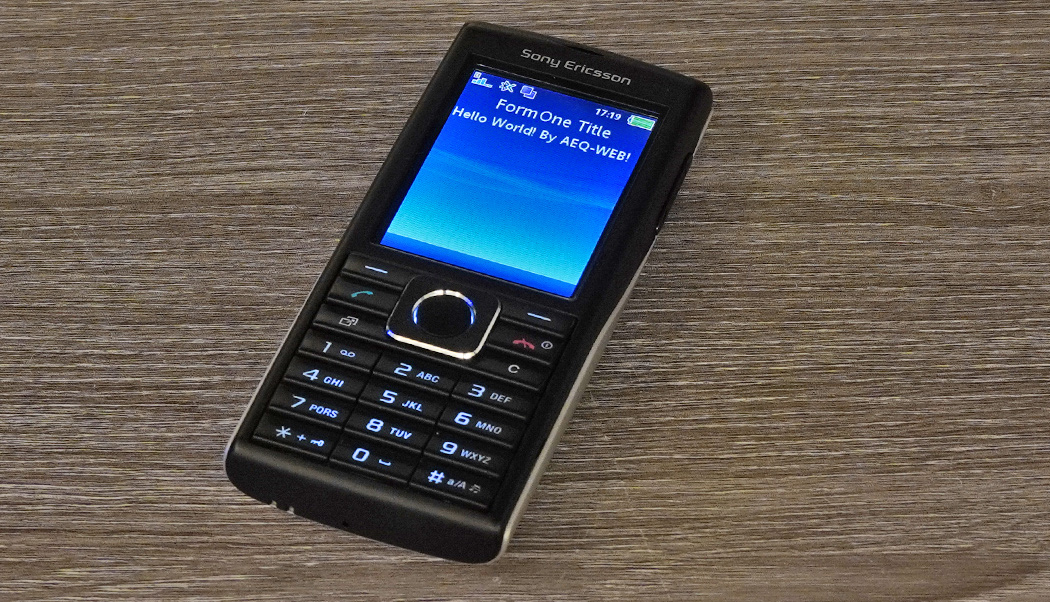
Apps for cell phones already existed before the first Android smartphones or iPhones. As early as the early 2000s, Java was used as a programming language for small applications on cell phones. There was no app store, but many mobile network operators had their own mobile website where small applications and games could be downloaded via GPRS or UMTS. Later, applications and games were also downloaded to the phones via infrared, Bluetooth or USB as JAR files and shared between users. This article is about setting up a development environment for J2ME apps as well as a simple practical programming example for cell phones that were common at the time.
Caution: Some desktop applications used in this article are no longer under development and may therefore be incompatible with newer operating systems and contain security vulnerabilities. Installation on productive systems is not recommended!
J2ME is the Java Platform Micro Edition, which was developed especially for portable devices such as cell phones or PDAs. Over time, the end devices became more and more powerful, so that the Java Standard Edition also prevailed in this sector. The advantage of J2ME was also the independence of the JavaRuntime, so that J2ME applications could be executed on different operating systems and devices such as Nokia, Sony Ericsson, Siemens and so on. The basis for this is the CDC (Connected Device Configuration), which is not limited to cell phones, but is also available for DVB receivers and other multimedia devices. The application interfaces (API) of this runtime environment are made available as "profiles" and can provide new functions for later developments.
The MID profile (Mobile Information Device Profile) is often used for mobile phones. There are several versions of this profile, but there is little difference between them. In this case, the widespread J2ME applications are also often called MIDlets. In the high-level API, the MID profile provides I/O elements such as text fields, input fields, alarm boxes (alerts), progress indicators and much more. The low-level API, in turn, can be used to create pixel-level elements. When entering data, for example, the high-level API would be used to process entire strings (texts, numbers, etc.), while the low-level API would determine a single keystroke and its actuation period. The last example is mainly used in game development. The currently widely used MIDP 2.0 or MIDP 2.1 also supports HTTPS connections, streaming and multimedia features for game developers.
There are various options and tools that can be used to develop J2ME MIDlets apps. For the following practical example, an older JDK version (example: J2SE Development Kit 5.0-22) is required to run the Java WTK (Wireless Toolkit), which is also required. Optionally, a better text editor such as Notepad++ is also highly recommended, as it can clearly display Java code. More information about the necessary tools and the download links can be found in the Installation Guide of JDK & WTK..
The first J2ME MIDlet app is very simple and includes the minimum necessary packages and methods as well as a simple text field where a previously defined text is output. Following the successful simulator test, a JAR file can be generated from the Java source code, which is also executable on most cell phones. First, the Java Wireless Toolkit is opened and a new project is created. The project name and MIDlet class name are identical and are referred to as "MyFirstApp" in this case:
Note: Project name and class name can be chosen freely, but the Java file and its start class must be adapted correctly!
Clicking on "Create Project" creates the project and opens a window where the Target API platform has to be selected. Most cell phones support MIDP 2.1, so the default settings can be used directly:
Optionally, it is also possible to assign a different MIDlet name and to immortalize yourself as a MIDlet vendor (manufacturer name). This information is displayed on many cell phones under the app details. The parameters can be changed under the "Required" item:
After clicking "OK" the project is created and the paths to the project files are displayed in WTK:
A Java file must then be created in the "src" folder, named the same as the previously assigned class name "MyFirstApp.java":
Then open the Java file with a text editor and copy the code from the "Hello World" example:
After each change in the source code, the build process must be executed again! A click on "Run" now starts the simulator and executes the Java code:
When the application is finished being programmed and tested, a JAR file can be generated from the project. The JAR file can be used to install the programmed application on a cell phone or to pass it on to other users. The compilation process is started under the menu item [Project]->[Package]->[Create Package]:
WTK generates a JAR file and a JAD file. For the installation and distribution of the app usually only the JAR file is needed. Both files are located in the "bin" folder in the main directory of the project folder:
The JAR file can be sent to a cell phone via Bluetooth, infrared or USB and can be installed there:
In the first two lines packages with the following functions will be included:
[javax.microedition.lcdui]: This package is called the UI API and provides many functions for creating user interfaces in MIDP applications. This API consists of the high-level API and low-level API mentioned earlier. All elements that are displayed on the screen to the user are processed via the UI API.
[javax.microedition.midlet]: This package is responsible for exchanges between the application itself and the environment on which the application runs. For example, the runtime environment can pause the application during a call or close the application in a controlled manner. This package calls methods like startApp(), pauseApp(), resumeRequest(), destroyApp() and others.
In "public class MyFirstApp extends MIDlet{}" form and display are declared, which will be described later by the program accordingly.
"Public MyFirstApp(){} " calls the parent class with "super();".
After the app has been loaded, the method startApp() is called. This method now assigns a title for the current form and then appends the text "Hello World" to the form. The remaining two lines of this function now switch the form to the current screen.
Methods like pauseApp() or destroyApp() are called by the runtime in certain situations, but these methods do not contain any further commands. Therefore, no further processes take place.

Every day hundreds of meteorological radiosondes fall from the sky. In this article we convert a radiosonde into a GPS tracker for APRS, RTTY & CW
read more
This example code in C++, compiled with CMake, displays the current IP addresses of the network interface on both Windows and Linux.
read moreAEQ-WEB © 2015-2026 All Right Reserved