Amplifying Analog Voltages with the LM358
05.03.2025
Elektronik | Funk | Software
Der Technik-Blog


05.03.2025

25.02.2025
25.02.2025

12.02.2025

The SIM800 is a fantastic little GSM module for microcontrollers that has proven itself reliably for many years. This module is available as a separate small board (stand-alone) or in combination with a microcontroller such as the TTGO board or ESP32. The module is so popular because it can be accessed very easily with AT commands via a serial interface and it already has an extremely large number of features on board.
The SIM800 or SIM800L can receive and make calls. SMS recieving and sending are also possible. In contrast to other modules, this module can also transmit data via GPRS, which opens up a big horizon in the IoT. This enables HTTP or HTTPS requests with GET / POST parameters. TCP or MQTT data packets can also be sent over GRPS.
The SIM800 can be used with an Arduino. Attention: The SIM800 works with a logic level voltage of 3.3 volts. However, the Arduino works with a level voltage of 5 volts. Therefore, a voltage divider should be interposed on the transmission line (TX) from the Arduino, which reduces the voltage from 5 to 3.3 volts. This is not necessary on the receiving line because the Arduino only receives here and the 3.3 volts are sufficient. The module can either be controlled with standard serial pins (TX, RX) or via "any" pins with software serial. If you work with the hardware pins (0 & 1), you often have problems with the program upload or serial monitor, as these also access the same pins. Software serial eliminates these problems and you can user other free pins and access the serial monitor at the same time.
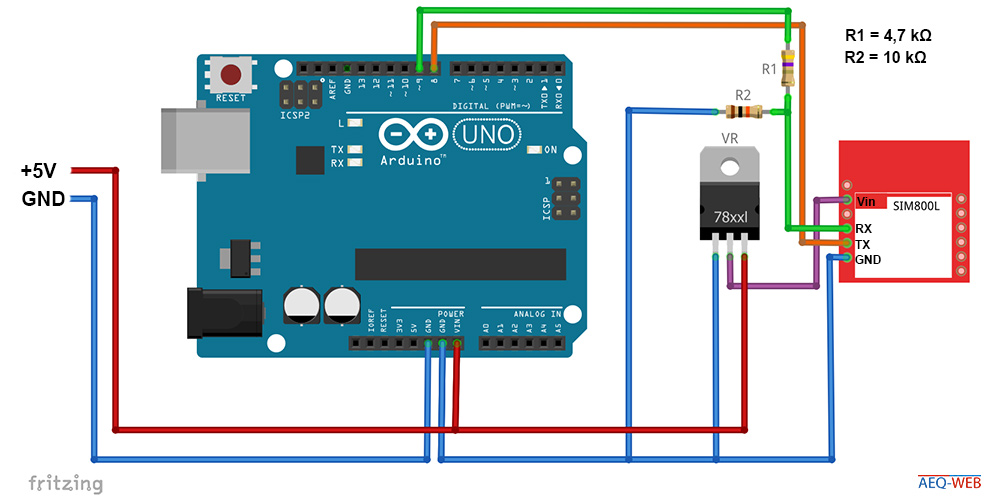
When it comes to the energy supply, you should have a stable voltage source that can deliver a permanent voltage between 3-4 volts. It can happen that the module briefly has a current consumption of up to two amps when sending, which is why the 3.3 volt pin on the Arduino cannot be used to supply the SIM800. The easiest way to achieve this voltage is with a step-down converter, which is connected in parallel with the VCC of the Arduino or, as shown in the circuit diagram, you use a fixed voltage regulator (VR), which converts 5 volts down to 3,3 volts. Another option would be a 3.7V 1S Li-Ion battery. Attention: Never supply the module with a higher voltage than 4 Volts! It can be damaged very quickly!
Another simple solution is the TTGO SIM800 board. This board combines an ESP32 with a SIM800 module. Compared to the Arduino, this combination offers some advantages, because you dont have to think about the level voltages, because everything works with 3.3 volts. In addition, you have a much more powerful and energy-saving controller and you hardly have to worry about the power supply in contrast to the Arduino version.
Communication with the SIM800 takes place serially using so-called AT commands. These commands are short, simple commands that are sent from the controller to the module. In the following there are two example codes (Arduino, TTGO) that transform the respective controller into a serial relay. This means that commands from the serial monitor are forwarded directly to the SIM800 module. Conversely, the response from the SIM800 is forwarded directly to the serial monitor. This allows you to test the connection to the module and control it completely manually. The software will do this automatically in future projects.
To be able to access the module with your Arduino, the SoftwareSerial library is required. This library is already installed in your Arduino IDE. The pins for SoftwareSerial must be defined in the code. As can be seen in the circuit diagram, pin 9 is defined for the transmitting line and pin 8 is defined for the receiving line.
void setup()
{
  Serial.begin(115200);
  Serial.println("SIM800 AT CMD Test");
  SWserial.begin(9600);
}

void loop()
{
  if (SWserial.available()) {
    Serial.write(SWserial.read());
  }
  if (Serial.available()) {
    SWserial.write(Serial.read());
  }
}
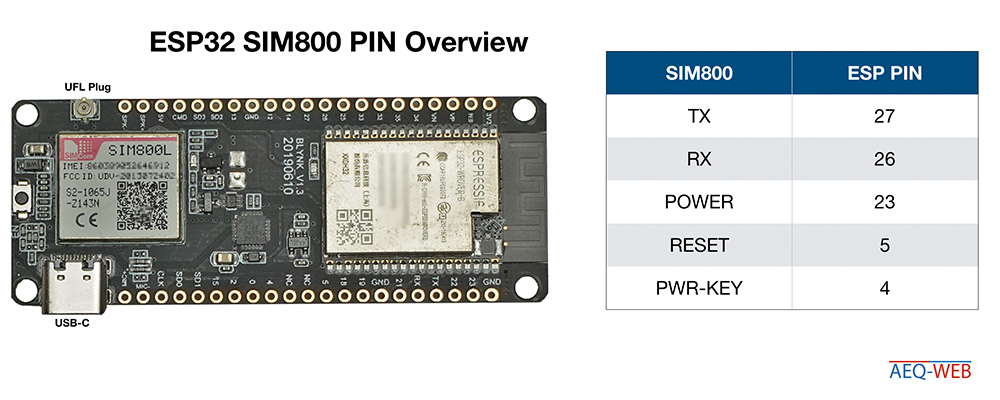
On the TTGO board, the serial connection to the module works similarly to the Arduino example code. It is important to switch on the SIM800 first. To do this, simply switch pin 23 to high in your code. You should wait about 10 seconds for the module to start up. Then you can activate the serial interface is on pins 26 and 27. Again, the baud rate is the same as in the Arduino example code.
//More information at: https://www.aeq-web.com/

#define SIM800L_RX     27
#define SIM800L_TX     26
#define SIM800L_PWRKEY 4
#define SIM800L_RST    5
#define SIM800L_POWER  23

void setup()
{
  pinMode(SIM800L_POWER, OUTPUT);
  digitalWrite(SIM800L_POWER, HIGH);

  Serial.begin(115200);
  Serial.println("ESP32+SIM800L AT CMD Test");
  delay(10000);

  Serial2.begin(9600, SERIAL_8N1, SIM800L_TX, SIM800L_RX);
}


void loop() {
  while (Serial2.available()) {
    Serial.print(char(Serial2.read()));
  }
  while (Serial.available()) {
     Serial2.print(char(Serial.read()));
  }
}
The following picture shows an example output in the serial monitor of the Arduino IDE:
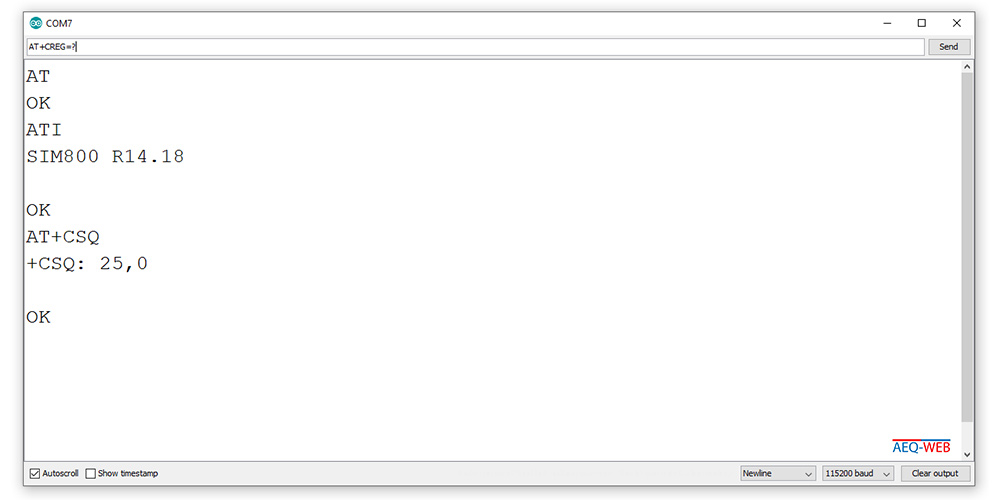
The baud rate for the serial connection is usually recognized automatically by the SIM800. According to the data sheet, all common rates from 1200 to 57600 bps are supported. If nothing else is necessary, start the connection with a baud rate of 4800 or 9600. Incidentally, the baud rate on the SIM800 can also be set to a fixed value using the command "AT+IPR=BaudRate".
The SIM800 in combination with the ESP32 can make a project very energy efficient. If you have a weather station that sends measured values via GPRS every 15 minutes, the easiest way is to switch off the module via pin 23. But there is also the case that the module has to remain switched on, for example because it has to react to calls or text messages. To do this, the module can be put into sleep mode using the command "AT+CSCLK=1". Attention: The module can not be reached via the serial interface. As soon as a call or a text message arrives, the module switches back to normal mode. In order to wake up the module anyway, the DTR pin can be briefly pulled to a low level. The command "AT+CFUN=X" offers further energy saving options. More information is available in the command overview.
There are some libraries for GSM modules that also support the SIM800l. However, there are occasional problems with these libraries, especially if the controller is not an Arduino. For this reason it is recommended to control the module directly with the AT commands. A very well-known library that also supports the SIM800 would be for example the TinyGSM Library.

Beside the upload to an ESP32/ESP8266 you can also export the finished program in the Arduino IDE to a file as BIN (HEX) and pass it on to others
read more
The SIM800 is a fantastic GSM / GPRS module. This article is about the commissioning and wiring of the SIM800 with an Arduino and the ESP32 (TTGO)
read more
05.03.2025
25.02.2025
25.02.2025
12.02.2025
AEQ-WEB ist ein Blog von Alex & Andi, der sich mit Elektronik, Funk & Software beschäftigt
read moreAEQ-WEB © 2015-2026 All Right Reserved