Amplifying Analog Voltages with the LM358
05.03.2025
Elektronik | Funk | Software
Der Technik-Blog


05.03.2025

25.02.2025
25.02.2025

12.02.2025
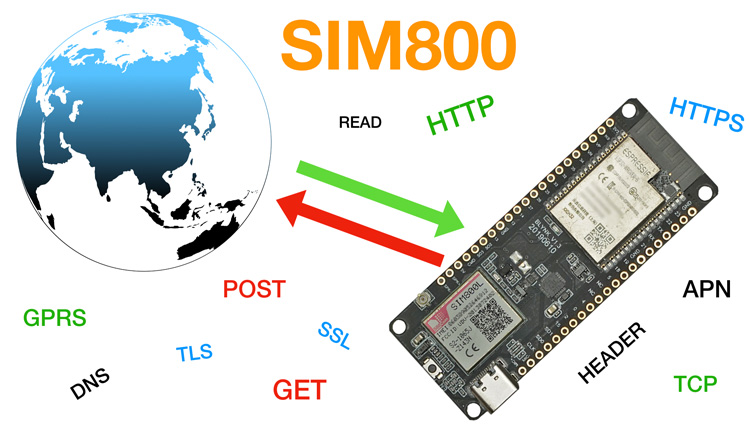
With the SIM800, data can be sent to a web server via HTTP using POST/GET. This allows you to connect a homemade weather station or other sensors to the Internet at a reasonable price if Ethernet, LoRa or WiFi is not available at the site. This article is about sending a HTTP request with the SIM800 using AT commands. All information about commissioning and wiring from SIM800 to Arduino and ESP32 is available in the SIM800 Basics article.
SIM800 - Basics with Arduino (Stand Alone) & ESP32+SIM800 Board
Normally, the module starts automatically as soon as the corresponding power supply is established. The module automatically logs into the GSM mobile network and can receive calls and SMS. In practice, the module needs about 10 seconds to start up, log in and get ready for operation. Only then it is possible to make calls, send SMS or, as in this case, GPRS data transmissions.
To access the Internet with the SIM800, GRPS is required. GPRS (General Packet Radio Service) is a service on the GSM network that enables packet-oriented data transmission. In addition, some configuration parameters are required, which are transferred to the SIM800 with the following commands:
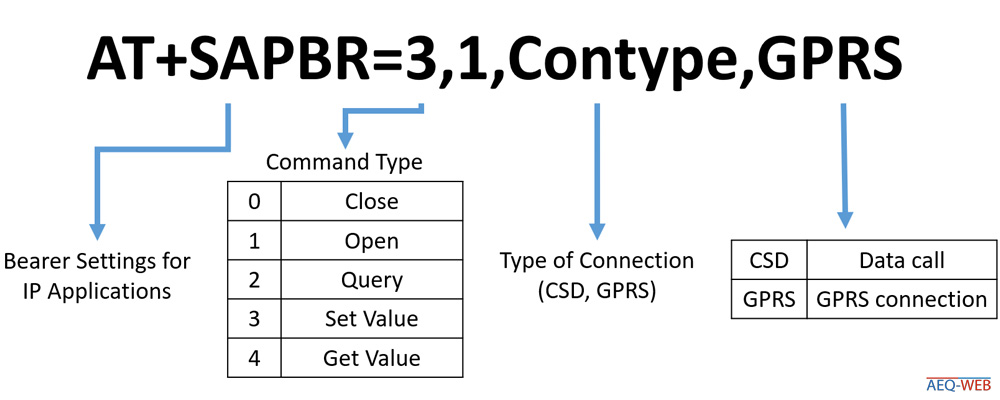
[AT+SAPBR=3,1,Contype,"GPRS"]
This command sets the GPRS connection parameter in the SIM800.
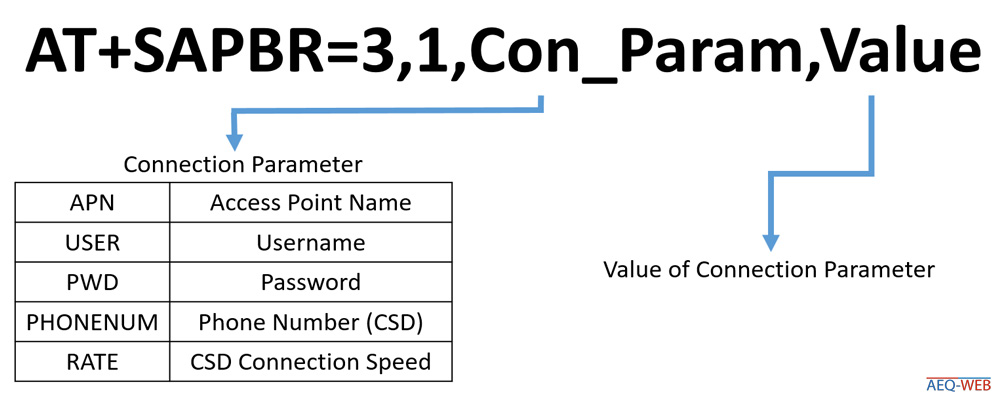
[AT+SAPBR=3,1,APN,"APN"]
This command writes the APN parameter to the SIM800. The APN (Access Point Name) is the access point (gateway) in the mobile network. The APN can usually be found on the providers website.
[AT+SAPBR=3,1,USER,"Username"]
This command writes the APN username to the SIM800. Note: Some mobile networks or APN do not require a username. In this case this AT command can be omitted completely.
[AT+SAPBR=3,1,PWD,"Password"]
This command writes the APN password to the SIM800. Note: Some mobile networks or APN do not require a password. In this case this AT command can be omitted completely.
After the SIM800 has received the configuration parameters, the actual GPRS data connection can now be established. Note: GPRS should only be opened immediately before HTTP request. After data transfer, the GPRS connection should be terminated with [AT+SAPBR=0,1]. The following command is necessary to start from the GPRS carrier:
[AT+SAPBR=1,1]
This command opens the carrier with the previously defined parameters. This can be seen as the start command for GPRS.
[AT+SAPBR=2,1]
This command queries the status of the previously opened GPRS carrier and is only for diagnostic purposes.
[AT+SAPBR=0,1]
This command terminates the GRPS carrier and is only executed after the data transfer.
After the SIM800 has successfully established a GPRS connection, an HTTP request can be started. Again, some parameters have to be sent to the SIM800 via AT commands.
[AT+HTTPINIT]
This command initializes the HTTP service. The SIM800 will be informed that an HTTP request starts.
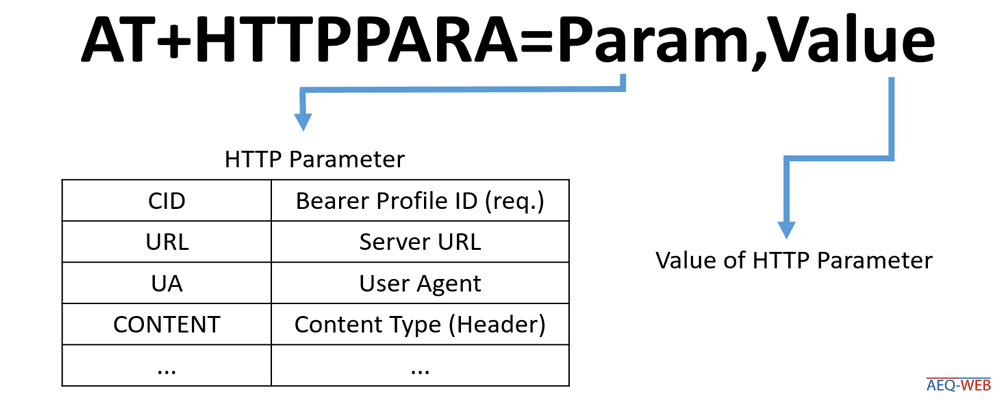
[AT+HTTPPARA=CID,"1"]
This command defines the carrier profile. Usually this is always 1.
[AT+HTTPPARA=URL,"URL"]
This command passes the URL to be called. It is the same format as it is entered in a web browser. If the server is not running on port 80, the corresponding port is simply added to the end of the URL or IP. Examples: http://www.aeq-web.com or http://123.123.123.123 or http://url.com:8080
[AT+HTTPPARA=CONTENT,application/x-www-form-urlencoded]
This command defines the content type of the current request. The content type is only relevant for the web server. It tells which media type in the request will be sent to the server.
[AT+HTTPDATA=192,10000]
This command defines the size of the user data to be transferred in bytes. Here the following applies: Better a little more than too little, but also not too much. The value 192 bytes is usually sufficient to transfer a few parameters (e.g. measured values of a weather station). The second number indicates the time (milliseconds) in which the data must arrive before the SIM800 aborts the request. This depends on many factors (connection, server, amount of data ...) and can be a value between one and 120 seconds. Again, 10 seconds (10000 ms) is a generous value.
[Postname=VALUE] (User data)
Once the previous command has been sent, the SIM800 waits for the user data. The POST parameters can now be transferred to the SIM800 within the previously defined time window.
[AT+HTTPACTION=1]
With HTTPACTION the transfer method is defined. The following applies: 0=GET, 1=POST, 2=HEAD. The response includes the status code from the server and the data length.
[AT+HTTPREAD]
This command passes the URL to be called. User data are also received via this command, which can be evaluated by the microcontroller for further control settings.
[AT+HTTPTERM]
This command aborts a running HTTP request.
The sample code for the ESP32 SIM800 board contains the AT commands mentioned above and passes them in the correct order. First of all, basic parameters (APN...) and pins must be correctly defined in the code for successful operation. The pins in the example code are already adapted to the board. All information is available in the article SIM800 Basics. Then the power supply to the SIM800 is switched on and the serial connection is activated. The software waits about 10 seconds until the SIM800 has connected to the mobile network and is ready for operation. Then the function "gsm_config_gprs" is called. All important parameters (connection type, APN, user name, password) are transferred to the SIM800. Important: If the SIM800 is switched off, these parameters must be communicated to the SIM800 again at the next start. Then the function "gsm_http_post" is called with the corresponding post parameters to be transferred. Here first the GRPS carrier is activated and then the HTTP function is called. When the data transfer is completed, the GPRS carrier is disconnected again and the microcontroller waits until this function is called again. The function "gsm_send_serial" handles the bidirectional communication with the SIM800. Via the loop the microcontroller waits about 3 seconds for replies from the SIM800. If the module needs longer with an answer, the function waits until the data has arrived. The output is in the Serial Monitor, which is suitable for diagnostic purposes. If there are still problems, the waiting time for answers can be increased.
/*  More information at: https://www.aeq-web.com/
 *  ESP32 SIM800 HTTP POST TEST | V 1.0_2020-AUG-18
 */

#define SIM800L_RX     27
#define SIM800L_TX     26
#define SIM800L_PWRKEY 4
#define SIM800L_RST    5
#define SIM800L_POWER  23

String apn = "APN";                    //APN
String apn_u = "";                     //APN-Username
String apn_p = "";                     //APN-Password
String url = "http://testserver.aeq-web.com/sim800_test/sim800.php";  //URL of Server

void setup()
{
  pinMode(SIM800L_POWER, OUTPUT);
  digitalWrite(SIM800L_POWER, HIGH);

  Serial.begin(115200);
  Serial.println("ESP32+SIM800L AT CMD Test");
  Serial2.begin(9600, SERIAL_8N1, SIM800L_TX, SIM800L_RX);
  delay(15000);
  while (Serial2.available()) {
    Serial.write(Serial2.read());
  }
  delay(2000);
  gsm_config_gprs();
}


void loop() {
  gsm_http_post("param=TestFromMySim800");
  delay(30000);
}

void gsm_http_post( String postdata) {
  Serial.println(" --- Start GPRS & HTTP --- ");
  gsm_send_serial("AT+SAPBR=1,1");
  gsm_send_serial("AT+SAPBR=2,1");
  gsm_send_serial("AT+HTTPINIT");
  gsm_send_serial("AT+HTTPPARA=CID,1");
  gsm_send_serial("AT+HTTPPARA=URL," + url);
  gsm_send_serial("AT+HTTPPARA=CONTENT,application/x-www-form-urlencoded");
  gsm_send_serial("AT+HTTPDATA=192,5000");
  gsm_send_serial(postdata);
  gsm_send_serial("AT+HTTPACTION=1");
  gsm_send_serial("AT+HTTPREAD");
  gsm_send_serial("AT+HTTPTERM");
  gsm_send_serial("AT+SAPBR=0,1");
}

void gsm_config_gprs() {
  Serial.println(" --- CONFIG GPRS --- ");
  gsm_send_serial("AT+SAPBR=3,1,Contype,GPRS");
  gsm_send_serial("AT+SAPBR=3,1,APN," + apn);
  if (apn_u != "") {
    gsm_send_serial("AT+SAPBR=3,1,USER," + apn_u);
  }
  if (apn_p != "") {
    gsm_send_serial("AT+SAPBR=3,1,PWD," + apn_p);
  }
}

void gsm_send_serial(String command) {
  Serial.println("Send ->: " + command);
  Serial2.println(command);
  long wtimer = millis();
  while (wtimer + 3000 > millis()) {
    while (Serial2.available()) {
      Serial.write(Serial2.read());
    }
  }
  Serial.println();
}
The following picture shows an output from Arduino IDEs Serial Monitor during an HTTP-Post query:
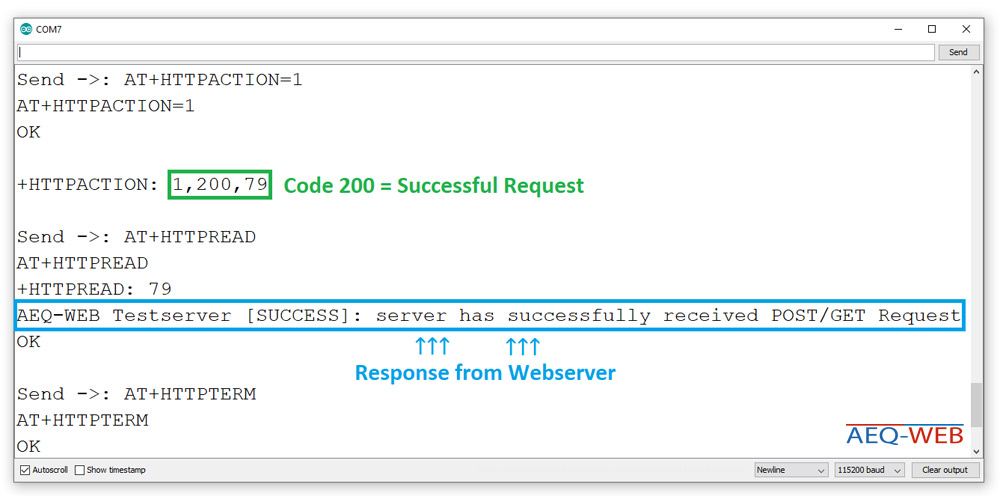
In contrast to the above example code, this one uses software serial for communication, because the hardware serial has some disadvantages. For more information see: SIM800 Basics. The commands and the program flow are almost identical to the above example.
//More information at: https://www.aeq-web.com/

#include <SoftwareSerial.h>

String apn = "APN";                    //APN
String apn_u = "";                     //APN-Username
String apn_p = "";                     //APN-Password
String url = "http://testserver.aeq-web.com/sim800_test/sim800.php";  //URL of Server

SoftwareSerial SWserial(8, 9); // RX, TX

void setup()
{
  Serial.begin(115200);
  Serial.println("SIM800 AT CMD Test");
  SWserial.begin(9600);
  delay(15000);
  while (SWserial.available()) {
    Serial.write(SWserial.read());
  }
  delay(2000);
  gsm_config_gprs();
}

void loop() {
  gsm_http_post("param=TestFromMySim800");
  delay(30000);
}

void gsm_http_post( String postdata) {
  Serial.println(" --- Start GPRS & HTTP --- ");
  gsm_send_serial("AT+SAPBR=1,1");
  gsm_send_serial("AT+SAPBR=2,1");
  gsm_send_serial("AT+HTTPINIT");
  gsm_send_serial("AT+HTTPPARA=CID,1");
  gsm_send_serial("AT+HTTPPARA=URL," + url);
  gsm_send_serial("AT+HTTPPARA=CONTENT,application/x-www-form-urlencoded");
  gsm_send_serial("AT+HTTPDATA=192,5000");
  gsm_send_serial(postdata);
  gsm_send_serial("AT+HTTPACTION=1");
  gsm_send_serial("AT+HTTPREAD");
  gsm_send_serial("AT+HTTPTERM");
  gsm_send_serial("AT+SAPBR=0,1");
}

void gsm_config_gprs() {
  Serial.println(" --- CONFIG GPRS --- ");
  gsm_send_serial("AT+SAPBR=3,1,Contype,GPRS");
  gsm_send_serial("AT+SAPBR=3,1,APN," + apn);
  if (apn_u != "") {
    gsm_send_serial("AT+SAPBR=3,1,USER," + apn_u);
  }
  if (apn_p != "") {
    gsm_send_serial("AT+SAPBR=3,1,PWD," + apn_p);
  }
}

void gsm_send_serial(String command) {
  Serial.println("Send ->: " + command);
  SWserial.println(command);
  long wtimer = millis();
  while (wtimer + 3000 > millis()) {
    while (SWserial.available()) {
      Serial.write(SWserial.read());
    }
  }
  Serial.println();
}
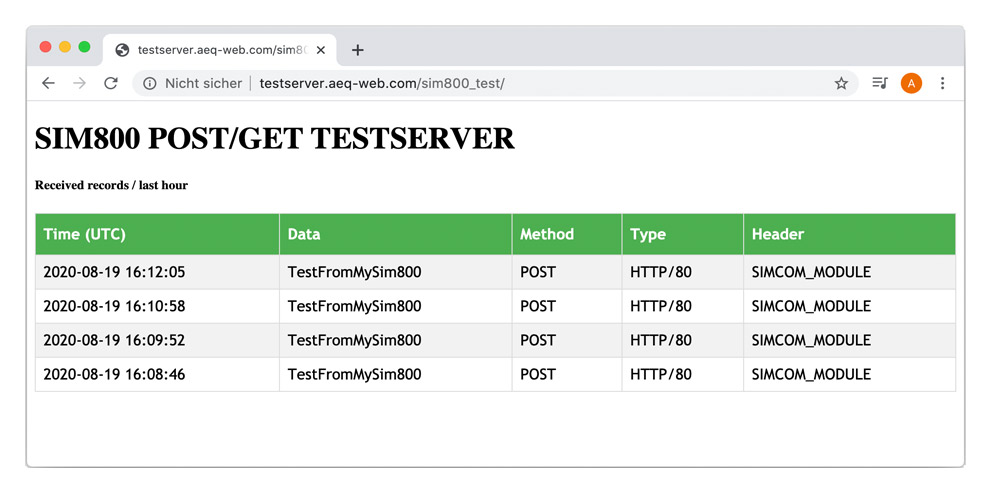
For productive operation, a separate web server/webspace is required. At the AEQ-WEB test server there is a small test program where the POST and GET function of the SIM800 can be tested. A request with the POST/GET name "param" can be sent to the server. The result can then be checked in a table. Attention: The transmitted parameter should not contain special characters or spaces and should not be longer than 20 characters. If there are more than 10 transmissions from the same IP address, the server blocks this address for one hour. At every full hour all received data sets are automatically deleted. Note: The test server serves as a pure diagnostic test tool. A permanent availability is not guaranteed. The user also agrees to the storage of browser header and IP address on our server.
Here you can find the test server: http://testserver.aeq-web.com/sim800_test/
The SIM800 supports SSL and can also communicate with a web server via HTTPS. The following requirements are necessary for this:
If the requirements on the web server are sufficient, the SIM800 can be used to make an HTTPS request with POST or GET parameters. To start a request with HTTPS, the URL must start with "https://". With the command [AT+HTTPSSL=1] SSL can be activated. This command must be sent before [AT+HTTPACTION], i.e. before the actual request is started. SSL connections to servers with invalid or self-signed certificates can also be performed. The command [AT+SSLOPT=0,1] disables the verification of SSL certificates.

The SIM800 has an HTTP client that can send data via GPRS with POST/GET to a web server. This article describes the necessary AT commands
read more
This article is a short instruction for programming your Baofeng radio with the freeware chirp. Link for USB Cable driver ca be found here
read more
05.03.2025
25.02.2025
25.02.2025
12.02.2025
AEQ-WEB ist ein Blog von Alex & Andi, der sich mit Elektronik, Funk & Software beschäftigt
read moreAEQ-WEB © 2015-2026 All Right Reserved