Amplifying Analog Voltages with the LM358
05.03.2025
Elektronik | Funk | Software
Der Technik-Blog

05.03.2025

25.02.2025
25.02.2025

12.02.2025
There is also a video on YouTube for this article: ATMega328 Amtel Studio Bootloader Flash (German)
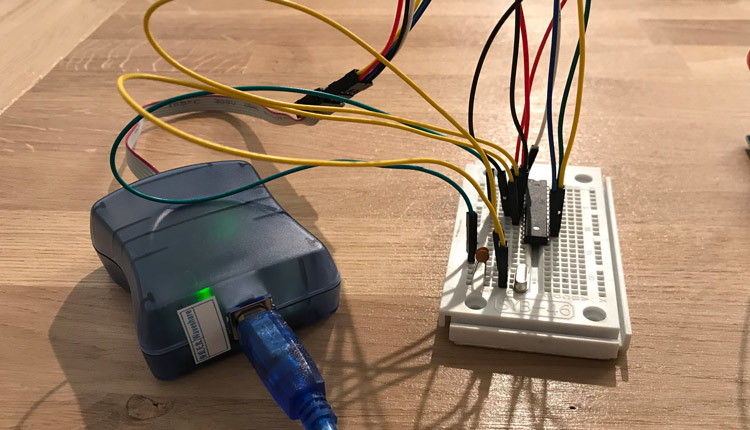
In this article we will show you how to burn the bootloader on an ATmega328 using a programmer without an Arduino Board. For this process, we have all components in use, which are absolutely necessary for the operation of the microcontroller without a board. In addition to a stable power supply for the flash process, a 16 MHz crystal and 2x22pF capacitors are required. When the physical setup is done, we will burn the Optiboot bootloader, which is also used on the Arduino board.
The ATMega328 from Amtel is exactly the same controller as it is used in the conventional Arduino Uno board. Therefore, it can also be programmed with the Arduino IDE and supports the full range of functions. The interfaces for other components or shields are also fully compatible. The microcontroller can also be programmed with the Amtel Studio. For beginners, it's more complicated in the beginning than with the Arduino IDE. For the controller to run independently, a clock is required. The oscillator consists a quartz oscillator and two 22 pF capacitors.It is important that these three components are located very close to the microcontroller and have the shortest possible cables. The oscillator sets the clock for the controller which is needed for a timer. The controller also has an internal oscillator, which could also be used for simple projects. The ATMega328 has the following technical data:
| Memory | 32 KB |
| RAM | 2KB |
| Voltage | 5 V |
| Pins | 28 |
| Pins (useable) | 14 Digital I/O, 5 Analog IN |

To program the microcontroller, a programmer is needed. This can burn or flash the bootloader onto the controller and subsequently load the software onto the controller as well. Overall, six cables are needed.There are many programmers on the market. We do not recommend the purchase of the cheap programmers, because often the setup for the Amtel Studio is very complicated, drivers do not work or the firmware of these programmers is outdated. Atmels original programmer costs about 30 dollar. It is an advantage if you buy this programmer once. The cables are connected as follows and have this function:
PIN 1: MISO
The first pin on the programmer is the MISO pin. MISO (Master In / Slave Out) receives the data from the microcontroller.
PIN2: +5V
The 5V are necessary for the power supply, so this is the positive pole. Attention: These 5 Volt Pin is not the power supply of the microcontroller!
PIN3: SCK
The SCK pin makes the clock. The clock is always determined by the master. The microcontroller knows that he is the slave.
PIN4: MOSI
The MOSI pin (Master Out / Slave In) behaves the same as the MISO, however, the transmission direction is here from master to slave.
PIN5: RESET
The Reset pin do the same as a conventional reset button. If the ground (GND) is connected to the reset pin, the controller resets and restarts the program.
PIN6: GND
The GND (ground) pin is the negative pole.
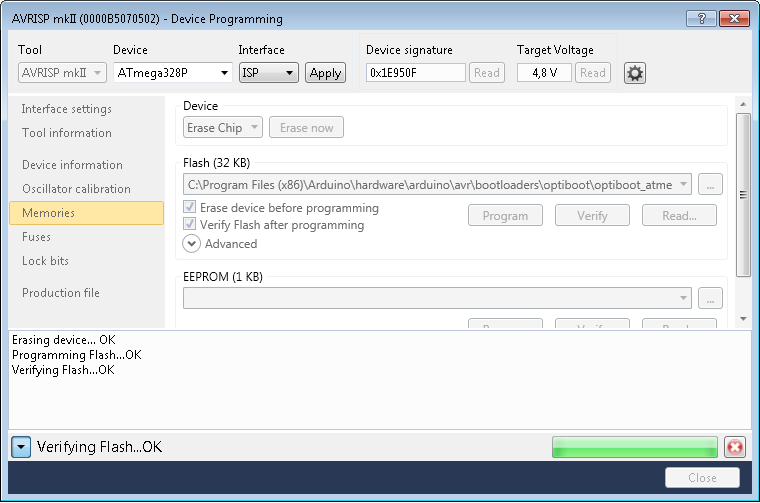
Amtel Studio is our development environment. With this software, the microcontroller can be programmed or as in this case the software can burn the bootloader. If Amtel Studio is installed, the AVRISP Programmer can be connected. If the basic wiring between the ATMega328 and the programmer is correct, the LED must be solid green. If the LED is red, the wiring between the controller and the programmer may be incorrect. It is also important that the external 5 volt power supply from the microcontroller is active. If everything works right up to this point, then you can call the tool for flashing in the Amtel Studio under Extras -> Device Programming. In this window you can select the programmer (AVRISP mk2) and the device (ATMega328P). By clicking on "Apply" the settings are saved, and if there is no error message, the connection from the PC to the programmer has already been established. If a message appears that the programmer needs an update, this can now be done. If you now click on the Read button, the tool should display a device signature and the voltage should be about 5 volts. If all of this worked, that means everything was connected correctly and the bootloader can be installed.
Under "Memories", the path to the boot loader file must be specified. The Optiboot bootloader is already on the computer once the Arduino IDE has been installed. Otherwise, the HEX file can be downloaded from Github.The required file is called "optiboot_atmega328.hex". Then click on "Program" and the tool starts to burn the bootloader.
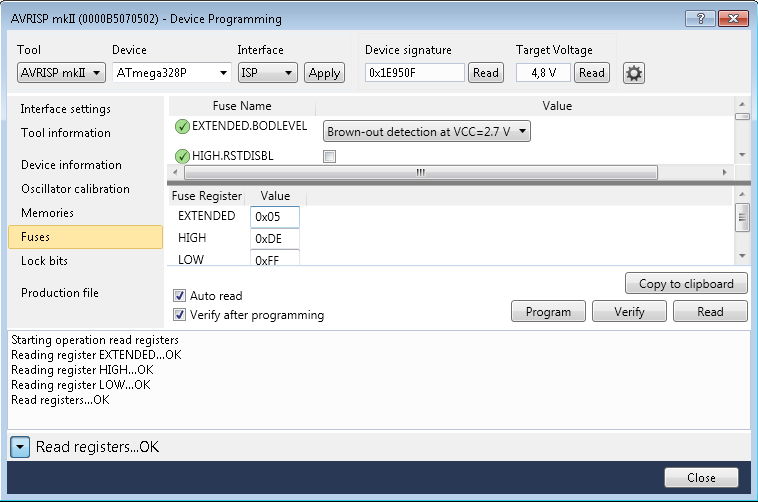
After you have burned the Optiboot Bootloader, you have to change some values at the fuse register . If you click on "Fuses", you will find three parameters, which must be changed to the following values:
EXTENDED: 0x05
HIGH: 0XDE
LOW: 0xFF
Fuses are security settings that can not be changed later. The documentation of a microcontroller describes the different fuse bits. Finally, click again on "Program" and the bootloader is completely burned to the controller.
When the bootloader is installed, it is possible to program the microcontroller. This is about the Amtel Studio, or even with the Arduino IDE. All other examples here are always based on this wiring shematics, where the ATMega328 is operated with an external oscillator and is programmed via ISP.
Needed components:

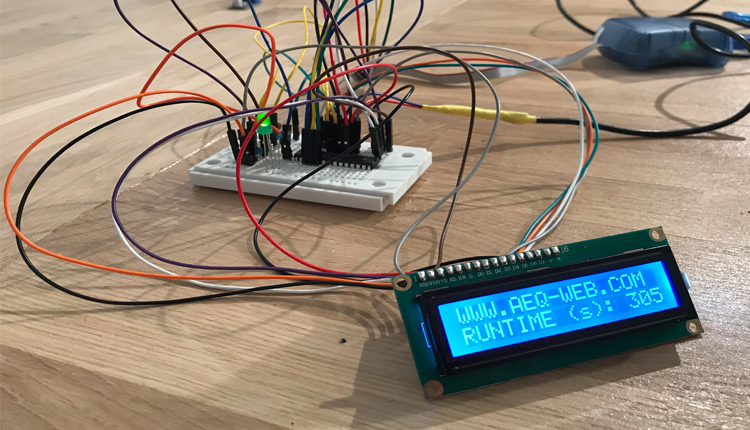
In this article we show how the ATMega328 drives a 16x2 character LC-Display with 4-bit. Everything is programmed in C with Amtel Studio and AVRISP Programmer
read more
In this article we show you how to flash the bootloader on the ATMega328. The microcontroller is connected directly to the AVRISP mk2 Programmer without an Arduino board.
read more
05.03.2025
25.02.2025
25.02.2025
12.02.2025
AEQ-WEB ist ein Blog von Alex & Andi, der sich mit Elektronik, Funk & Software beschäftigt
read moreAEQ-WEB © 2015-2026 All Right Reserved